When I ask students I am surprised at how thoroughly students would be able to explain to me why teaching was not an option for them. It is not a decision that they have made lightly. They know the projections of pay, the direction of legislation and the costs that they would need to input. But there are also good reasons to go into teaching that they are not aware of.
Unsettled research
The access teachers have had to cognitive science research and how learning works has been limited until recently. As we continue to improve our understanding of learning, the research connecting that cognitive research to teaching is stuck. Teaching must be complex enough to cause permanent change in the brain structure. Teaching must also be simple enough to not overwhelm the short term memory capacity. Many teachers and researchers embrace one of those ideals but not both. Thus a large conflict prevents us from pushing education research ahead. That will change in the near future and you would be able to be a part of that. Other fields have research that is so advanced and settled. Our knowledge of medicine, economics, philosophy, science and mathematics are advanced to a point where the specifics are so advanced that they contribute little. But education has so much room for growth and improvement. Soon our abilities to teach and learn those other fields will be limited to how quickly we can educate people to the point where they can understand the new research needs of them.
Autonomy
The most important factors in a career is not money. Study after study shows that having autonomy in your job is one of the biggest keys to being happy and feeling impactful. Next week I will be teaching about chemical reactions. The number of approaches and methods that I could use to do that is unlimited. I have so much control over what I choose to do. I can experiment and try something new. I can take ideas from other teachers. I can do what I did last time with minor changes. On Tuesday I will be doing a new lesson that I got the idea from a book that I am currently reading. At any given moment when inspiration hits I am able to put that idea into action. What other job has that at this level?
Ability to learn with an audience to keep you accountable
There was a reading teacher next door to me who would put up posters where she would put the book covers of books she read. I started to do so and quickly found myself reading more and more books. I am currently reading my 54th book this year and I love it. But being a teacher is a huge reason why I love it. I get to share what I read and learn with my students. If I read an interesting book about rust, I am able to use that in a lesson with my class. Everything that I learn about I have an audience to reinforce my own learning as I share it. I’m not convinced that if I went into work and was restricted from sharing my learning that it would not carry the same meaning to me. Whether the topic is history, chemistry, geography, environmental science, cognition or something else; I can always connect those topics to my teaching. It enhances my teaching.
The most difficult job
Teaching is the most difficult job that exists. The sheer volume of decisions that teachers make during a lesson is enormous. No matter how well you teach something there is always a way to improve your lesson because there are so many different options you have. Having the ability to deal with managing children in a way that optimizes their learning involves decisions about their cognition, their prior knowledge, their emotional health, the physical arrangement of the room and the lesson medium. Because of the overwhelming number of students (150-250) you must have plans for an incredible number of disruptions and adjustments to make. You have to introduce a new idea in a way that maximizes learning, provide practice that maximizes learning and give assessments that measure the learning that took place. All of that must be done to a large group of students with wildly different experiences and prior knowledge. Whether the goal is to maximize learning or to maximize homogeneity in knowledge is inconsistent depending on the objective, course and content piece. Behind all of these pieces is the content itself. I must understand all of the chemistry I am presenting which includes all of the chemistry that students perceive. I must understand and be prepared to respond to every conception that a student brings to the classroom along with what evidence and theory can advance those conceptions to better models. It is an unending journey towards a perfection that doesn’t exist even in theory. No other profession comes close to the combination of skills needed to maximize success. And that challenge is welcome. Teachers seek challenge. They want to be pushed to the limits of human ability.
Online networks
When I was in high school teachers were isolated. They would seek community in lounges, but the atmosphere was potentially toxic. With social media teachers are able to connect with other teachers. We have access to the best of the best and can use each other to further our own abilities. The sharing and cooperation that results from social media has opened new doors to teachers from mentorship opportunities, to highlighting creativity, to challenging our own conceptions and ideas about teaching. These networks incentivize teachers to push beyond the typical boundaries of teaching that have existed in the past. Teachers can share improved models, dual coding and concrete examples for content. Teachers can share research, new pedagogy and more advanced curriculum. Teachers can learn from others about organization, technology, and creativity in lessons.
Three years ago was a very busy time in my teaching career. I had just attended a three week long workshop on teaching chemistry using modeling pedagogy. I walked away ready to completely overhaul my teaching methods and even institute standards based grading in my chemistry class. At the same time I was teaching IB chemistry HL for the first time ever. I had a group of seniors in their second year and a group of juniors starting the course. Today we received our third set of data and the 2018 group is our first group of students to have been taught using modeling pedagogy prior to taking IB Chemistry HL. The first two groups (2016, 2017) took chemistry prior to IB Chemistry HL, but they took chemistry before I had attended the workshop and were taught using traditional teaching methods.
Figure 1: IB score distributions from 2016-2018
Figure 2: IB average scores (3.96, 3.74 and 4.42) from 2016-2018
The data is limited because it only represents 25, 27 and 31 students for the three groups. There is also likely variation in my teaching abilities as I have become more familiar with teaching IB Chemistry HL. But the data does match my experiences while teaching the three groups. The modeling pedagogy increased the ability of the students to question the material we learned. As the content became more difficult there was a presence of mind to push for evidence behind the conclusions I would present. While we did continue to use modeling teaching for some lessons (equilibrium, crystal field splitting) the biggest difference to me was the level of analysis that students applied in their learning was at a deeper level. They made more connections between content areas, they were able to visualize systems at the particle level and change back to symbols quicker, they had more experience and context to learn in a more permanent fashion.
None of these comments are an indictment on the first two groups. All three cohorts of students had remarkably intelligent and successful students that did brilliant work in class. They all had strong metacognition and did deep levels of analysis of chemistry. I also do not feel that I taught these first two groups poorly. We did a lot of engaging activities and reflection for all three groups. The modeling approach in the chemistry prerequisite course I believe to have elevated the 3rd cohort to an improvement of that learning. There is a frequent concern amongst teachers that altering teaching methods will lead to students not being prepared for the most challenging coursework that they will take in the future. While there is a lot of uncertainty and unreliability in the data in Figure 1 and Figure 2 based on student and teacher variation, there is evidence to support modeling having a positive impact on top students that move on to take a course such as IB Chemistry HL. To get the IB Diploma students need to average a 4 score on their classes with a few technicalities mixed in. The % of students achieving a 4 or better improved from 52% to 59% to 68% over the three years. Many students that get a 3 in HL chemistry still get their diploma and students getting a 3 or better went from 80% to 93% to 93%. Our diploma rates for the three years were steady at 79%, 79% and 82%. It will be another two years before I have a group test as our program has grown and I now only teach every other cohort.
I hate grading. Grading takes so long and marking wrong answers for hours on end after spending so much effort on teaching is an emotional drag. Grading isn’t just obnoxious because it is redundant, length and often mindless. For high school teachers it can often be used as a tool to shame students, to make them feel bad about themselves and that blame is tough to share and unhealthy to deflect to students and their parents.
I was listening to a podcast about how we do not remember our memories correctly. We replace our memories with what we currently believe as often as possible because of how brain storage works. If you currently are aligned heavily with a set of political ideologies, you are likely to shift your memories towards those same ideologies. But I couldn’t help listening to this podcast to think about how grading affects teachers negatively. When teachers grade they see the correct answer 170 times. They even see the wrong answers so frequently that they will often tell the next group in advance of what mistakes they will make. So when a student repeats a mistake it can produce an unhealthy response. We think of students as lazy or that they don’t care. This happens especially when teachers are put under external pressure from administrators, parents and even the students themselves. And as we continue this year after year we eventually reach a point where it is beyond the teacher to remember what it was ever like to learn the material for the first time. We shift our memories to think of our subject matter is being so clear and simple that we disconnect from reality.
About six years ago I was going through my files and I found a set of exams from when I was in college studying chemistry. I looked them over and a multiple-choice question from my advanced thermochemistry class caught my eye. I read a question and saw that I had gotten it wrong. It was about entropy, enthalpy and spontaneity and I got really upset at myself for getting it incorrect. In fact, I remember thinking how furious I would have been had one of my students, even a struggling student, if they had made the same mistake I had made in my third year of college. I had taken high school chemistry, AP chemistry and was over 30 credits of chemistry in to my degree when I made that mistake.
I think that moment has prevented a lot of negativity towards my own students as I now can remember with a little bit of evidence that sometimes students know something but struggle with the mechanics of the question, sometimes new information makes us uncertain and sometimes it just takes time to understand a concept. When students get questions wrong I no longer take it personally. I will never get angry at a student for being wrong or needing more time to understanding something. If a student or parent tries to push an unhealthy pressure on me I feel comfortable deflecting that pressure away and not engaging with them. And I believe I just found the perfect grading system to make this all work.
I have now been using standards based grading assessments for the past three years in my chemistry classes. This has been a minor change as it is really just chopping up the test into sections that focus on 6-10 concepts from a unit (examples are on my chem website). I liked the organization and felt that it improved feedback to students and parents. But in the past two weeks I have started to add one last feature and I think the slight increase in grading is about to be overwhelmed by the reduction in mental health stress in grading. Students will now be able to reassess on standards.
The logistics I am currently planning on using involve having students complete a form for any standard that they wish to reassess that focuses on directing students back to what we learned in class. They can then improve their understanding of the topic and reassess. Reassessments will happen once per week on a rotating after school and lunch schedule that so far has been very reasonable to execute. The following year I will join with the teacher next door to me so that each of us is only responsible for every other week to supervise students reassessing.
Grading still is not fun, but the last two tests that I have graded I have felt so much more at ease with student mistakes. It is no longer an omission that will compound as the year progresses, but instead feedback that the student can rectify and incentive for them to reflect on their understanding as well as what they accomplish during class time. It is no longer an indictment of my teaching but instead feedback to me on what went well and what did not. It is no longer a cycle of two week periods where students rush through material, but instead this allows us to slow down when needed without losing content.
Student #1 - The gas particles expanded because there was empty space.
Student #2 - Gases like to fill their container.
Student #3 - The balloon filled up because there was a vacuum.
There is a common misconception or lack of conception about gas particle motion. The ideas start when students are very young as we teach them about solids, liquids and gases very early. To compensate for the fact that students are not ready for the particulate level at this age we use observations of what happens at the macroscopic level. Liquids take the shape of the container but do not fill it. Gases fill the container and take its shape. Solids are unaffected by their container. Even though we do not express the particle level (or do so very poorly) students will still formulate ideas about why these differences exist. By the time students finally get to a chemistry class where they can connect the macroscopic and particulate levels there are significant obstructions in place.
There are a number of demonstrations available to test these obstructions and misconceptions and get students thinking. But teachers must be very wary of oversimplifying the demonstration and offering their own explanations. This can cause students to reinforce their misconceptions. Instead focus on observations and begin providing students with the tools to organize particle level pressure analysis based on speed/temperature, direction, number of particles, size of the container and surroundings. For an example consider the demonstration where a balloon is blown up backwards using a flask with hot water.
Initially the flask has mostly air in it at a similar pressure to the surrounding atmosphere. As the flask is heated, steam pushes some of the air out leaving the flask to contain steam and some hot air. There is a smaller density of particles in the flask than out because the higher speed creates a similar pressure with fewer particles. If there were the same density of particles in the flask as outside then the higher speed would result in a greater pressure in the flask than the atmosphere. A greater pressure would mean more frequent collisions with the the container, and also the hole which would lead to more particles leaving the flask than entering. It is only when the particle density is smaller in the flask that the pressure will be the same. Now the balloon gets placed on the flask and the flask is removed from the hot plate. The particles in the flask begin to slow down as the temperature drops. This causes fewer collisions and smaller collisions and thus a drop in pressure occurs. The external or atmospheric pressure is constant and thus becomes larger in pressure and the balloon is pushed in until the smaller volume in the flask reaches a similar pressure to the atmosphere again.
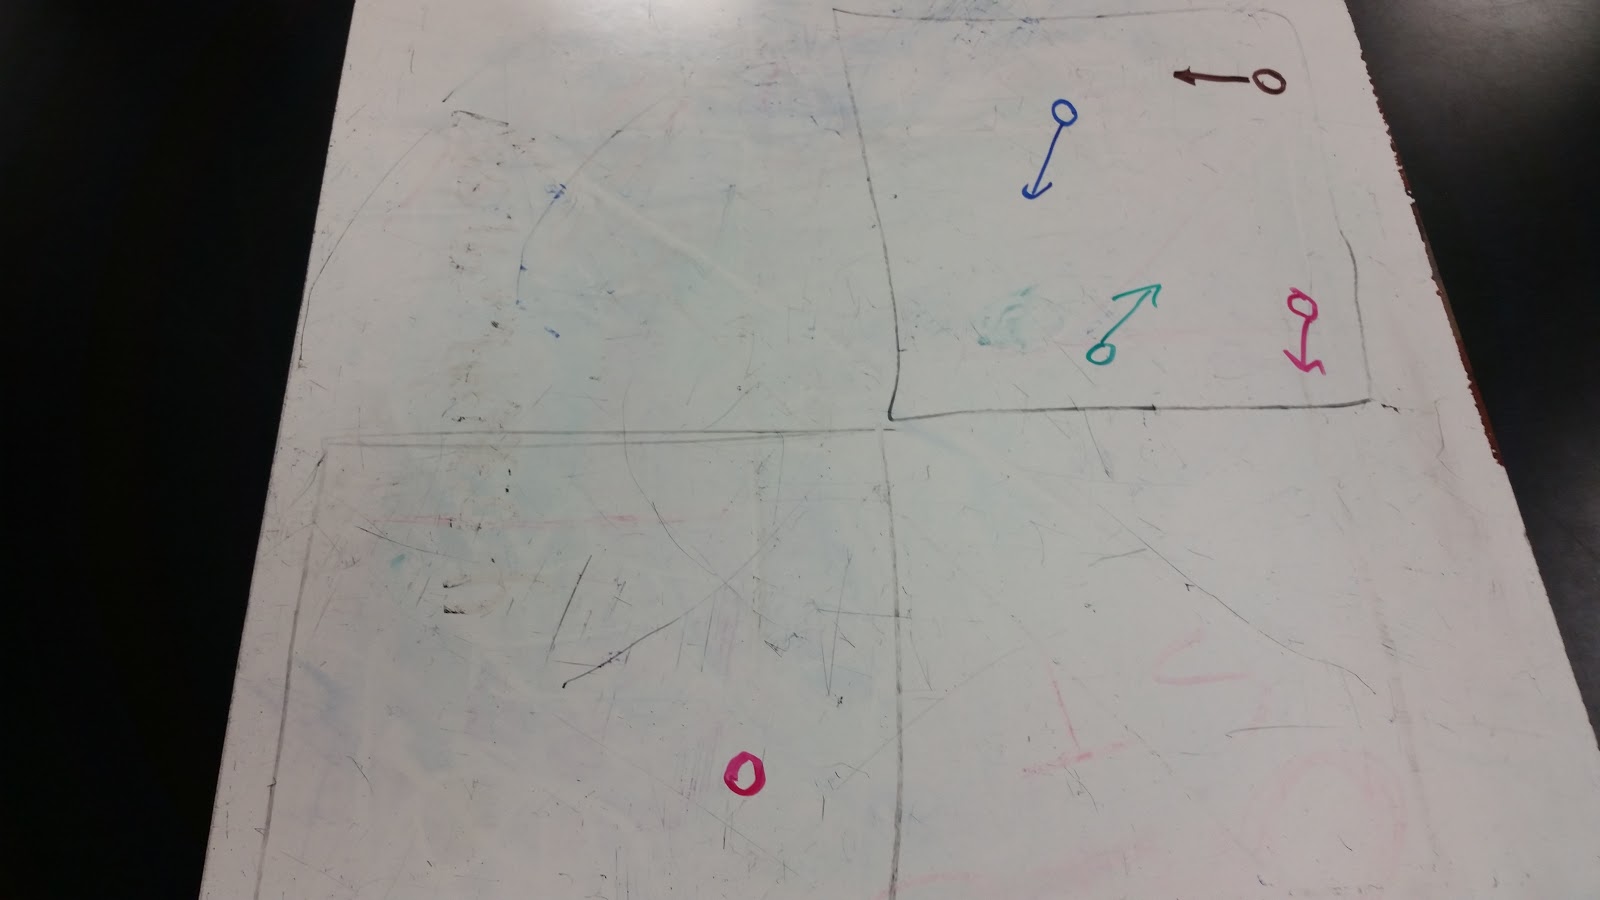
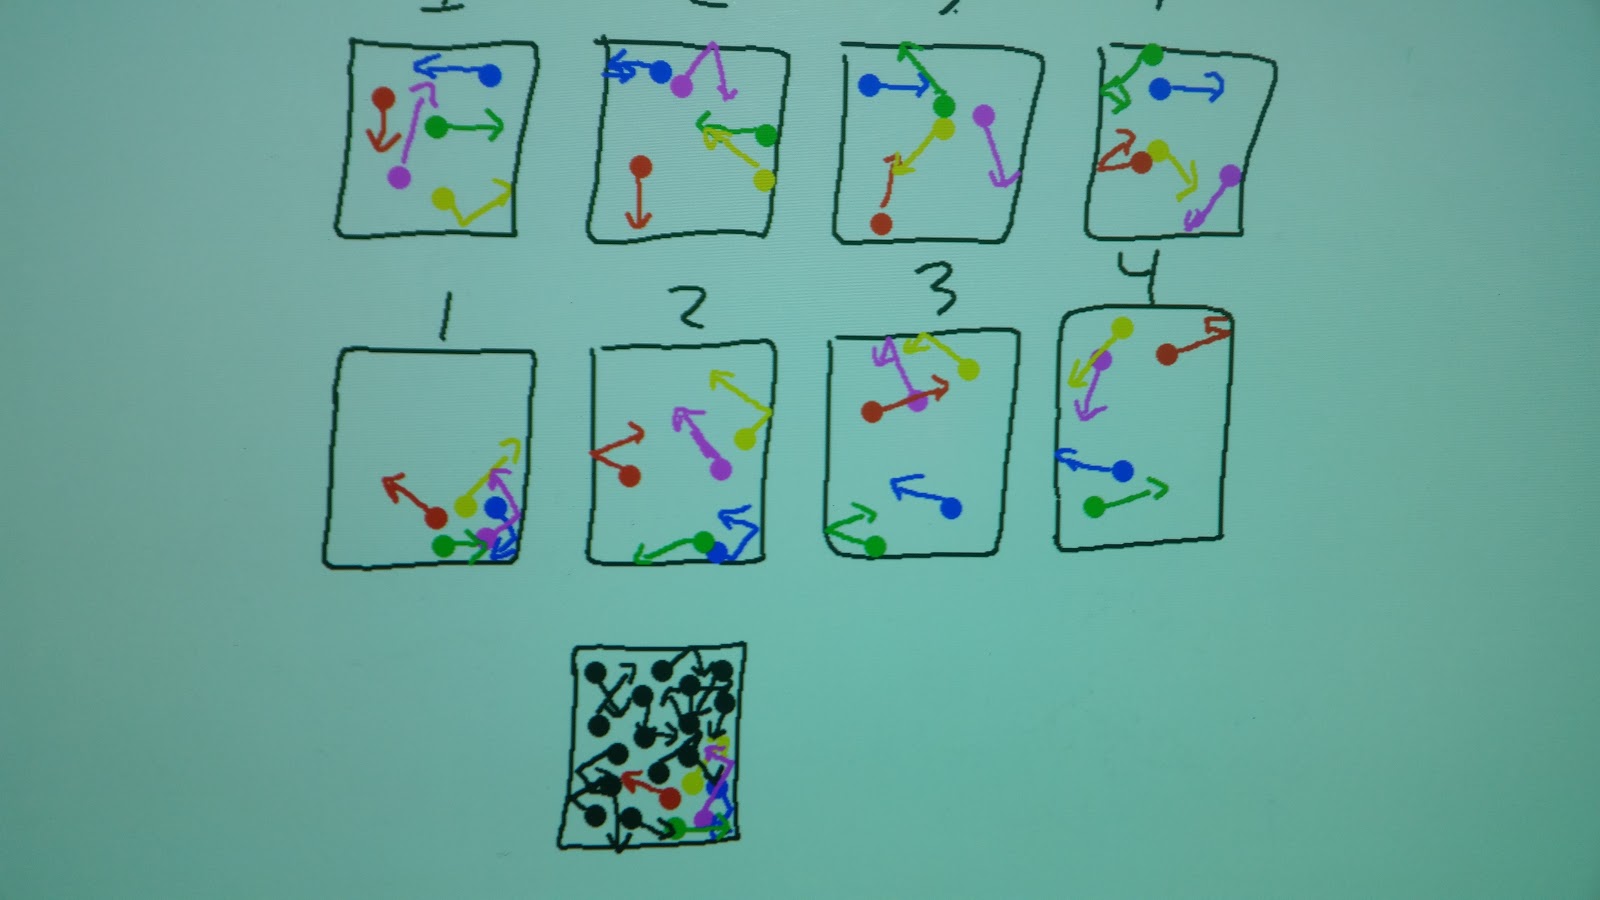
In order for the student to properly analyze such a situation they really need to articulate multiple steps and critically analyze the number of particles, volume of container, speed of particles and how each of these affects the overall pressure. This task can be aided by using particle level drawings but it is indeed a formidable task. Most students being overwhelmed with this task resort to adding in human features to the particles instead. The particles have less space so the air particles move in to fill the empty space. An underlying feature of these student alternative conceptions is that particles will move towards an empty space but students do not realize why this occurs. This is crucial to eradicating some of the structures that we begin with. To begin addressing this have students draw a simple diagram with multiple colors and motion in multiple directions such as in Figure 1 below.
Figure 1: Student representation of an initial state of a gas.
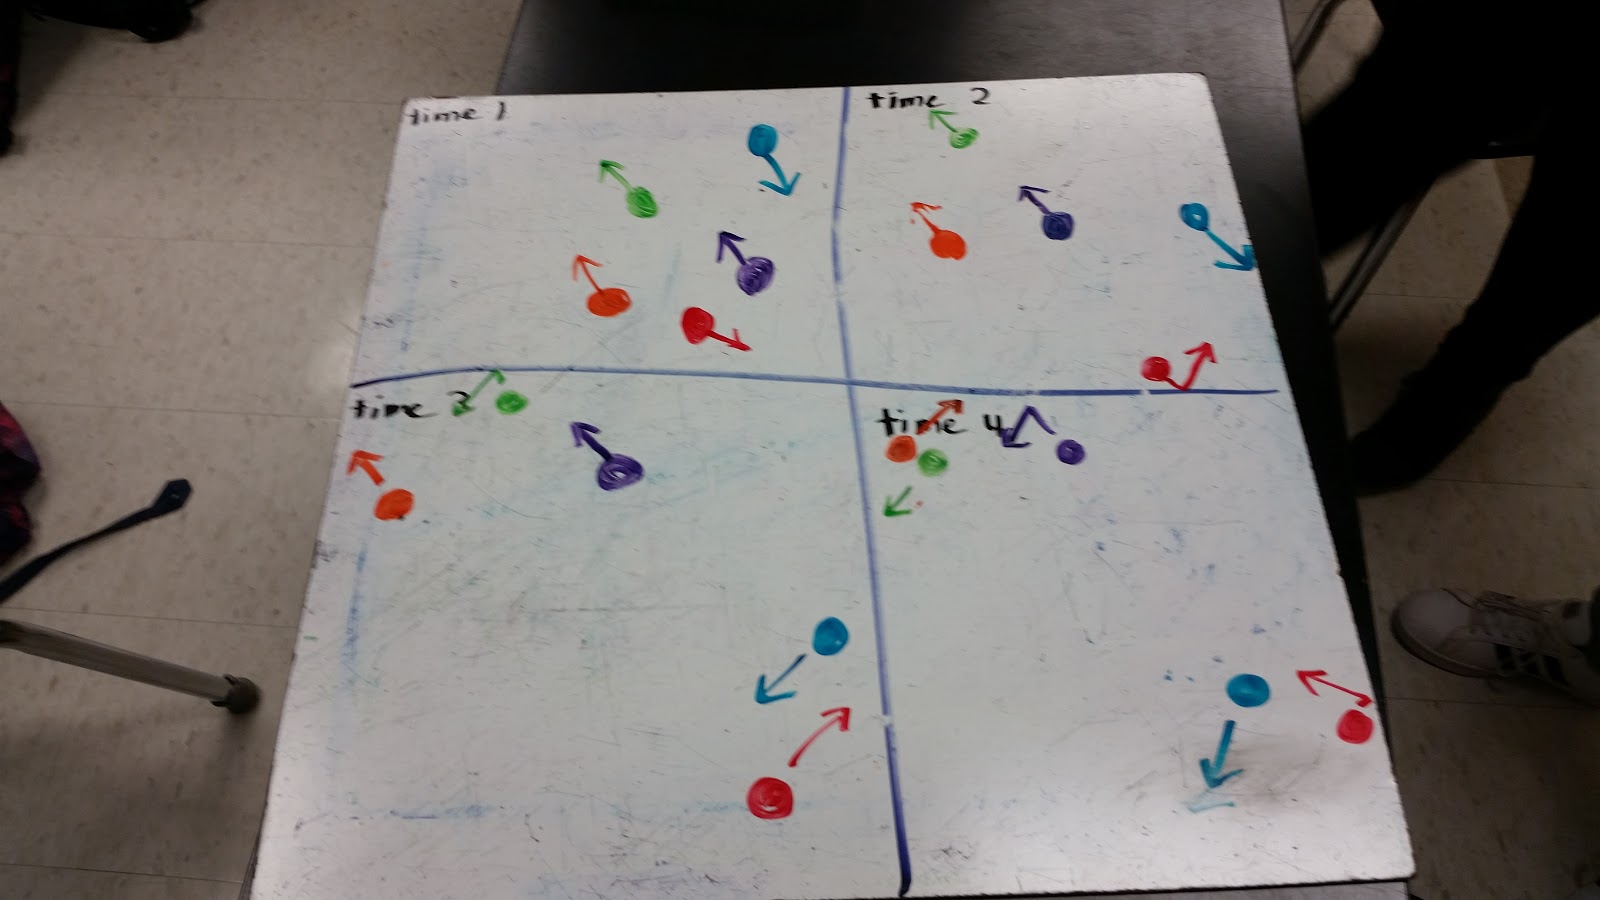
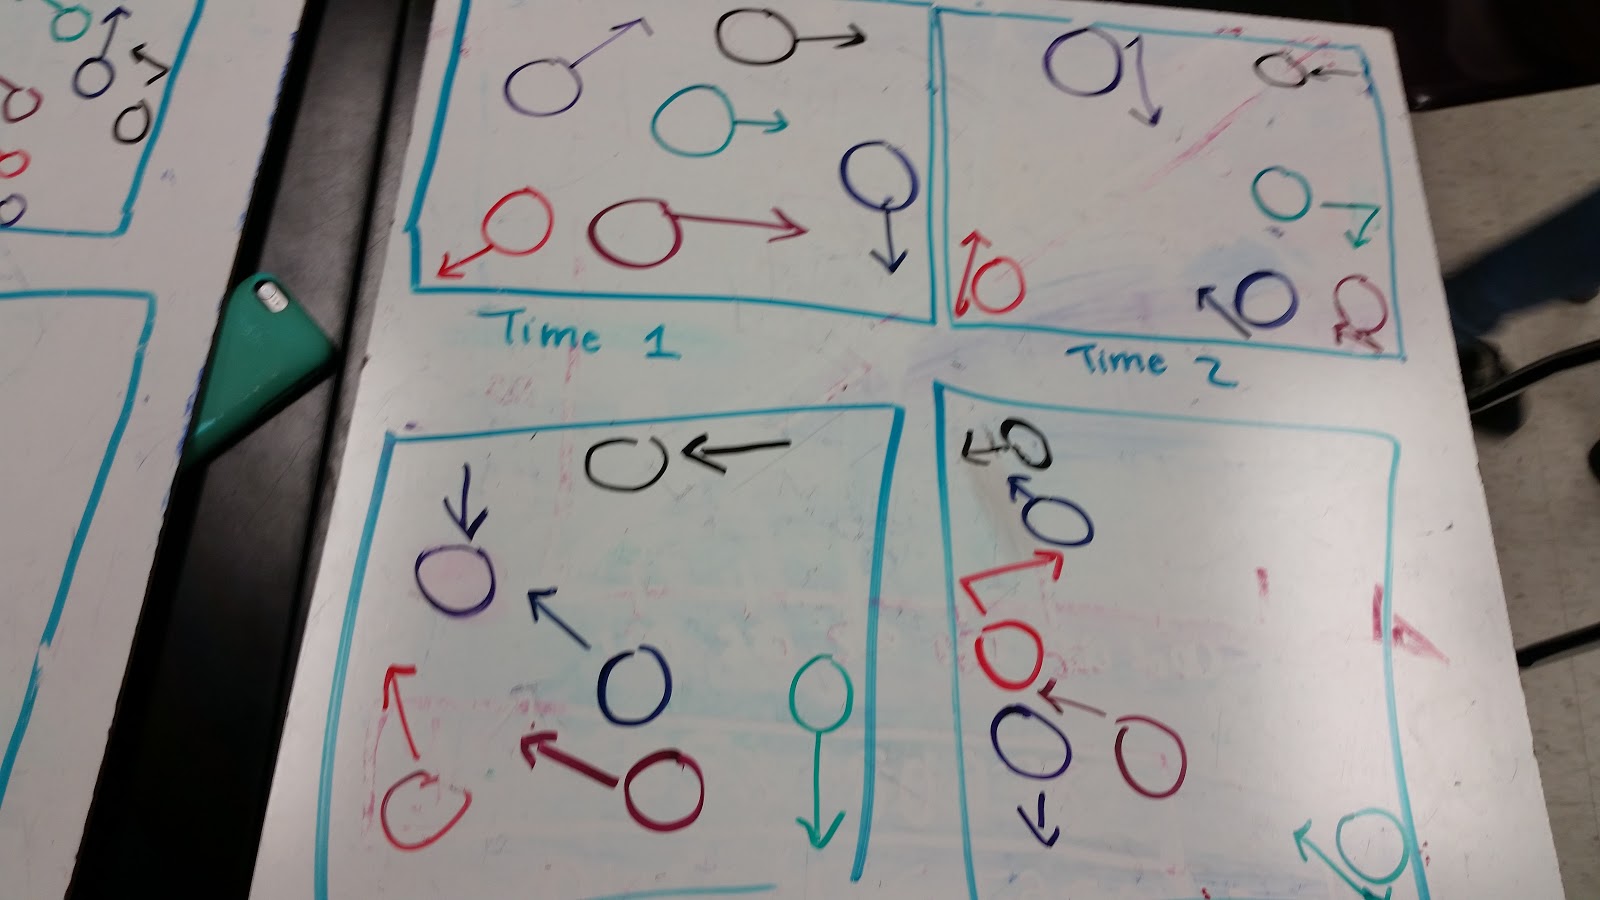
Then instruct the students to determine where the particles will be a short time later (IE after the time needed to move the length of each arrow). Have them draw four different diagrams in sequence showing the particles’ positions based on their motion.
Figure 2: Student works showing how the particles move about based on their initial positions and motions
Ask the students why the particles moved the way that they did. Ask clarifying questions if needed such as should the particles change speeds, will the particles collide with the walls and other particles? Try and emphasize that there is no special direction or cause of the motion but that the particles were just moving to begin with and thus changed where they were.
Now the plot twist.
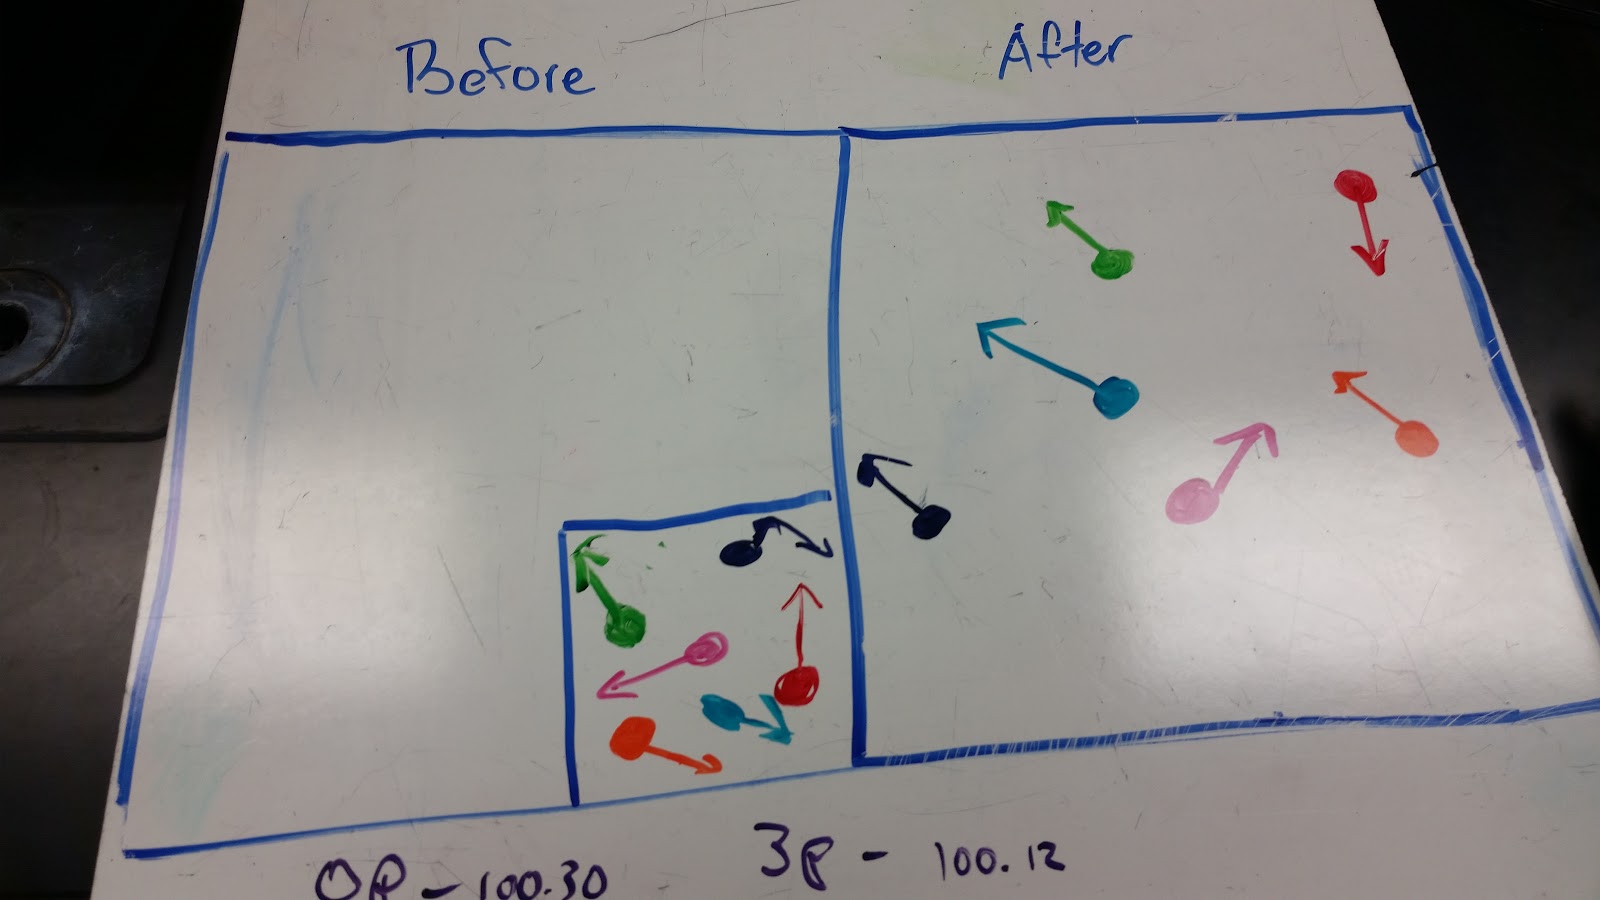
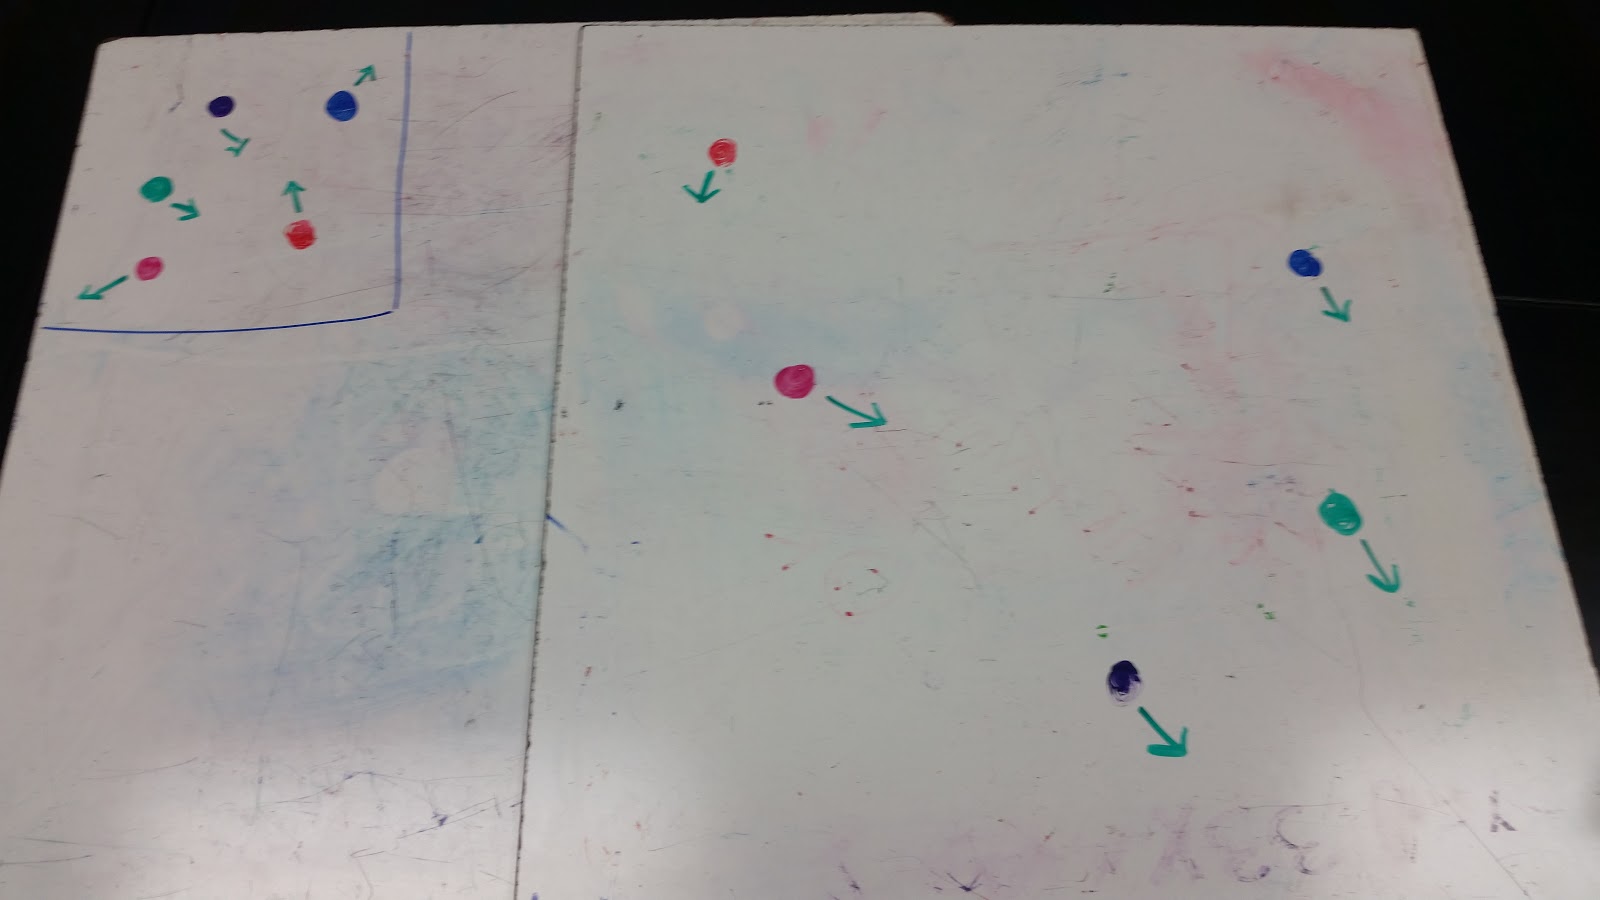
Have the students restart on a new whiteboard if possible and draw a bunch of particles in one location such as in Figure 3 below.
Figure 3: Students restart having all particles in 1 location (IE in a balloon)
Now have them complete the same process as before. They should note that as the particles move about that the particles spread throughout the container because the motions are in different directions and there is nothing to oppose their motions.
Figure 4: Gas particles starting in a confined space that become free to move around
Why did the gas particles fill the container? Was it because they like to spread out? Was there a big reason or did they just happen to be moving in a way where they would spread out for no reason other than they were already moving to do so? The particles that stay in the corner bump and collide causing them to change directions while those moving away from the corner are not impeded. There is no force needed for the particles to fill the container, there is no suction. The gas fills the container solely because gas particles move and they are moving in various directions. (AP Chemistry teachers might even have seen a professor express that it is equally likely that all particles could have all of the energy as an equally likely microstate as a somewhat even dispersal. This is false because the initial conditions make it impossible for that to occur.)
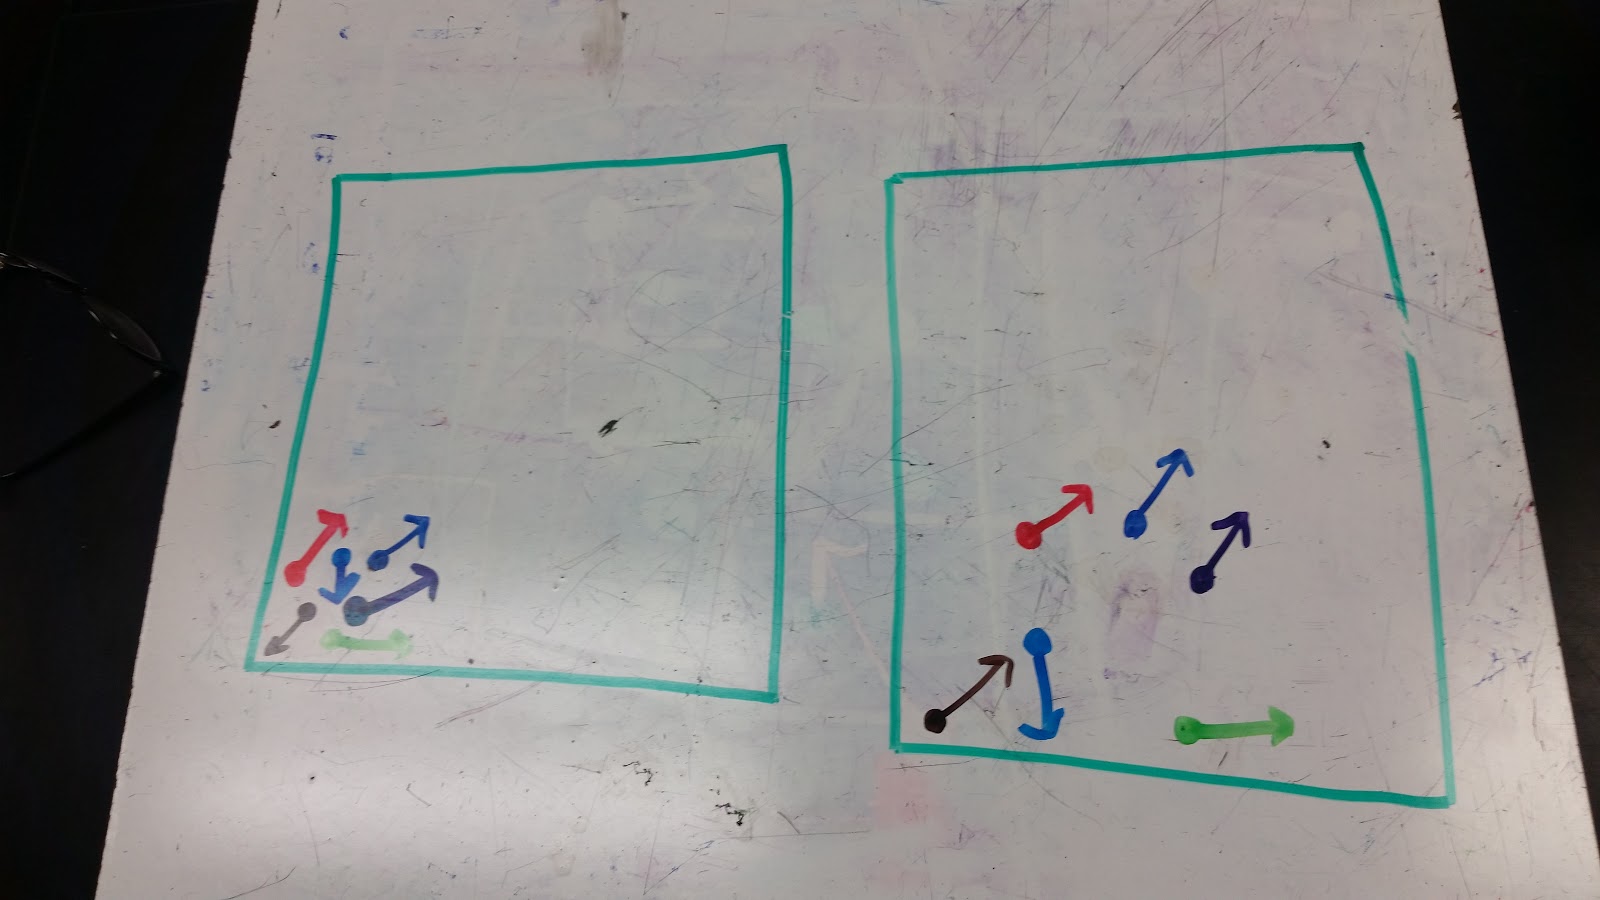
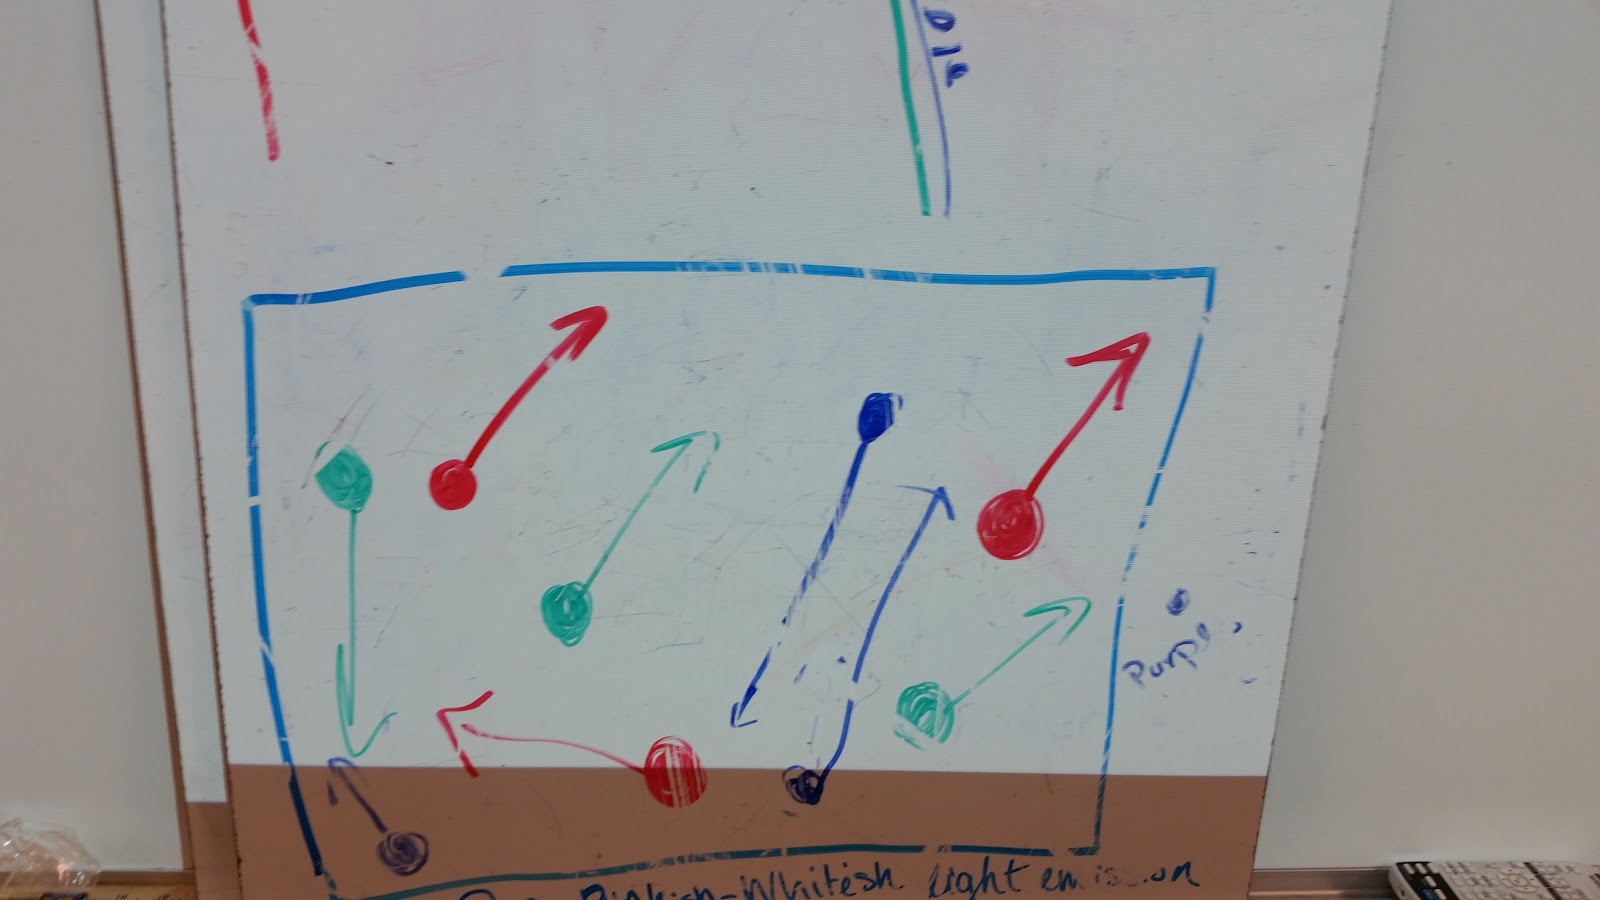
Figure 5: Teacher representation of gas particles moving and a confined gas that was released moving. The bottom image is a confined gas for comparison purposes.
In Figure 5 above one can see the difference between gas particles moving throughout an enclosed space and gas particles confined to one small section of a confined space. Did the left corner exhibit “suction” towards the particles? Did they move towards the empty space because they wanted to fill it? Absolutely not. Rather the fact that gas particles move in various directions as an intrinsic quality of the particles is all that is needed for the spread of particles to occur. There is no differentiation between the top series and the bottom series in Figure 5. There is no way for the empty space in the second series box 1 to pull or force the particles to move. There is no such thing as a suction force. A gas particle cannot be pulled. But there is an interesting tendency for the gas to spread based on the particles various motions.
A high-level discussion that may be appropriate is what happens when you breathe. It is probably natural for most people to assume that when they take a deep breath in, that they pull air in. If you breathe in right now it will appear to you that you are controlling the air. But you are not. Your lungs cannot exert a force on air outside of your body. Only the particles touching your lungs can be affected by your lungs. The air that moves in when you breathe in was already on its way towards your lungs, you just caused fewer particles to be restricting their motion in. By expanding your lungs using your muscles, fewer particles leave your mouth and the same amount of air is still moving towards your mouth and lungs as before. Thus a net flux of air in occurs. But those particles weren’t sucked in, or pulled into your lungs.
(This discussion might also bring up the misconception that air leaving a rocket causes the rocket to move forward, a common misconception from Newton’s 3rd law)
After discussing breathing I had students ask about slurping noodles and drinking out of a straw. Both were fantastic additions to the discussion as slurping requires contact between the substance and this makes it possible to create a force on the noodle particles. The straw of course is dependent on the external pressure. Some follow up concepts worth using to assess are why do gases move from high pressure to low pressure and modifying that with varying temperatures. For example, if a high temperature gas and low temperature gas have the same pressure, why is there not a net transfer of particles? Would the densities of the gases be different? What would happen if the hot gas cooled down? Do the collisions cause speeds to change? Do all gas molecules in a sample move at the same speed?
With a better understanding of why a gas will fill its container and a better model to work with students should now be ready to give a much better analysis of common gas law demonstrations. If anyone does the 2-L with a nail in it or the notecard on a mason jar filled with water; both of these demonstrations rely on a small amount of water leaking. This causes the trapped gas inside of the container to decrease in pressure because the space available increases from the small amount of water leaving. This causes the pressure from the atmosphere to be greater by enough to balance the pressure of the weight of the water and trapped gas. For the 2-L the water stays in as long as the cap remains on and for the notecard the notecard stays in place and prevents a student from being soaked.
If you use a vacuum pump to show marshmallow, balloon or shaving cream expansion make sure to explain to the students how the vacuum pump is engineered to allow particles to leave the glass dome and get pushed out by the engine, but particles are prevented from re-entering the dome. Vacuum filtration is always a much more visible representation of this that students that continue on to organic chemistry in college will likely see repeatedly.
When I first did gas pressure demonstrations the goals were simple. I wanted students to articulate that gas pressure was caused by collisions and that pressure could be exerted in multiple directions. But now I want them to be able to get to the point where they do higher levels of analysis of what is happening during demonstrations. I want them to organize when temperature changes and when it doesn’t. I want them to identify when there is a difference in particle densities. I also want them to avoid adding human qualities to gas particles and this exploration where students draw arrows and then follow them through like a comic book strip might just be the key to seeing that to fruition.
Students were taught about light and then asked to write a reflection on what they used to think light was and what they now understand it to be. The three principal lessons used are described below and then student comments in their reflections are used to evaluate the models they develop, the physics struggles and some reflection on what they need to bring with them from previous classes and experiences.
Lesson #1 - Spectral Emission Lines
Students observe emission tubes using spectrometers. They attempt to match the spectra they observe with spectra on a poster.
Figure 1: Students working during lesson 1
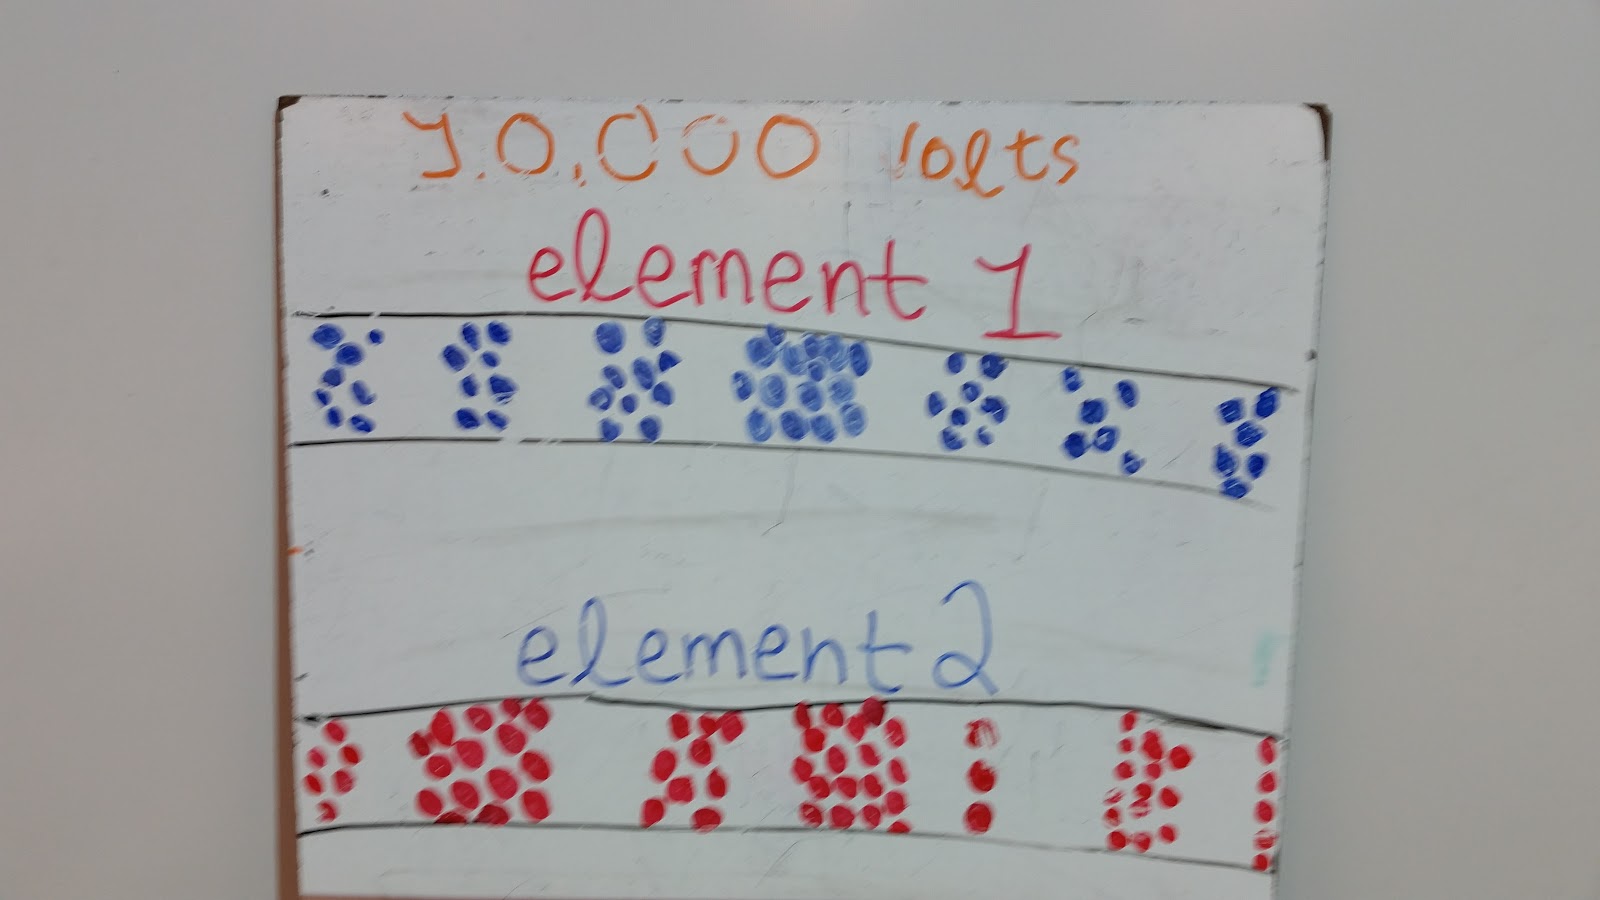
After the students have spent time observing spectra they are asked to complete a whiteboard that shows a particle diagram of what is happening in a H-emission tube at 10,000 V. They are guided with two agreed upon observations, first that multiple colors are emitted and secondly that different elements gave off different sets of colors. With 3 classes completing this task, there were eighteen whiteboards produced. Zero of these boards showed electrons or charged particles. Many showed colorful Hydrogen particles.
Figure 2: Whiteboard of initial student model of light emission
Figure 3: Whiteboard of initial student model of light emission
Figure 4: Whiteboard of initial student model of light emission
Figure 5: Whiteboard of initial student model of light emission
Figure 6: Whiteboard of initial student model of light emission
The initial student models show that the task is very advanced for the students. No boards show electrons in their models. Some students consider the particles themselves to be the color of the light, some show faster particles producing different colors of light and one board (Figure 4) even shows the particles arranging themselves into a wavelength form where the bulk particle arrangement is the difference. None of the students are even close to having a working model of why an element will only emit certain colors and not others.
Lesson #2 - Flame testing
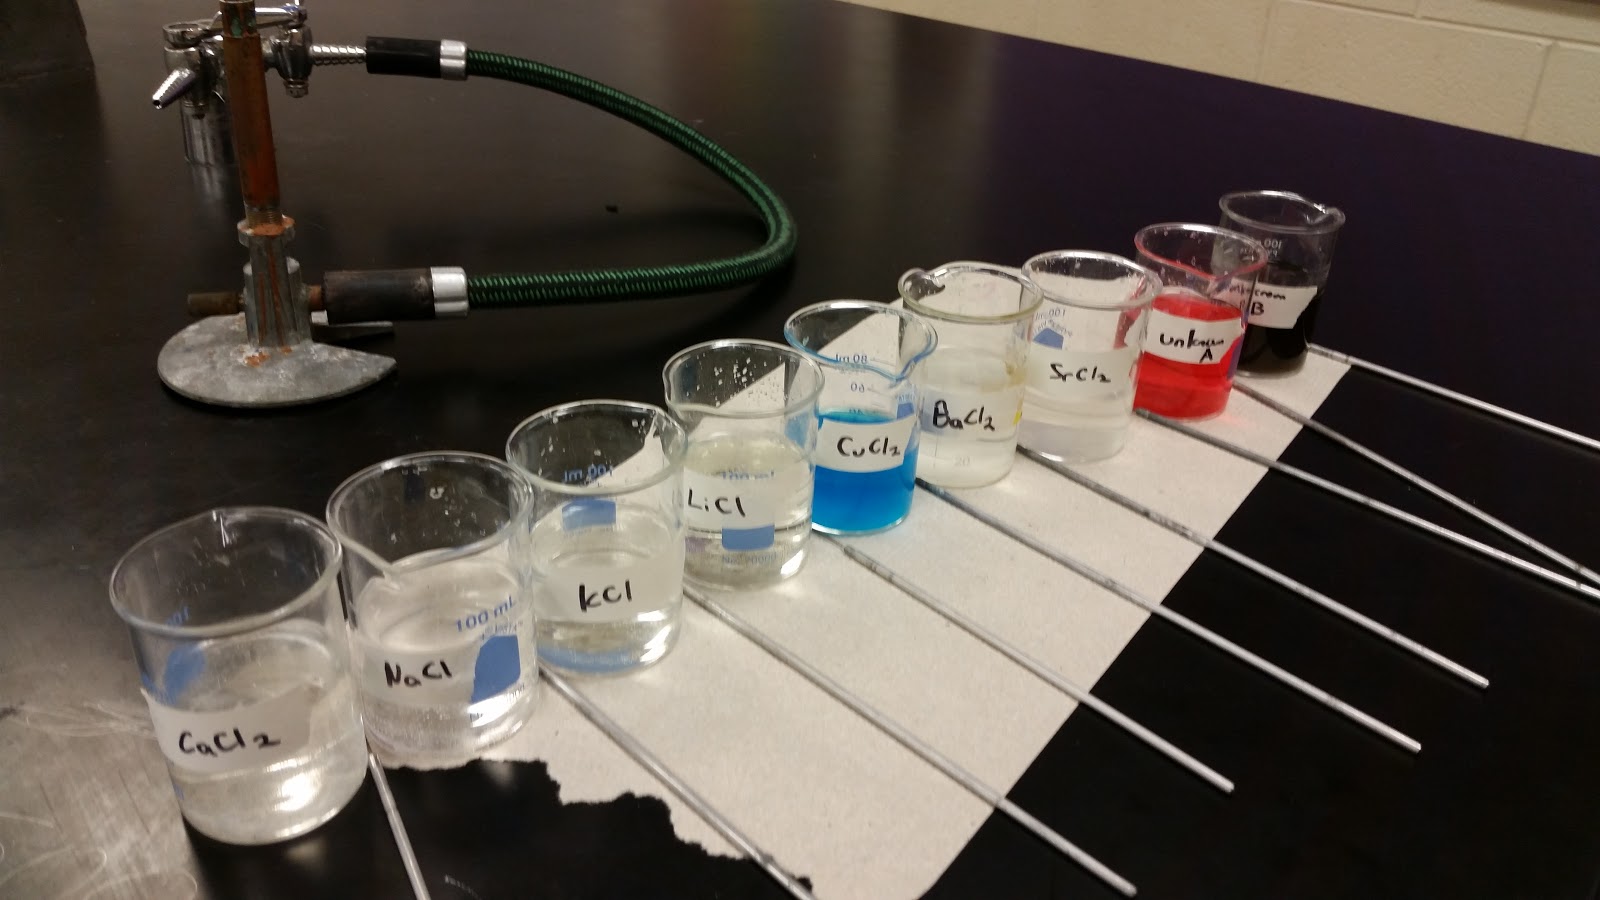
A continuation of the concepts from lesson #1, the students here are tasked with flame testing various salt solutions and then identifying two unknown solutions with food coloring added.
Figure 7: Solutions to be flame tested including unknowns A and B with food dye added
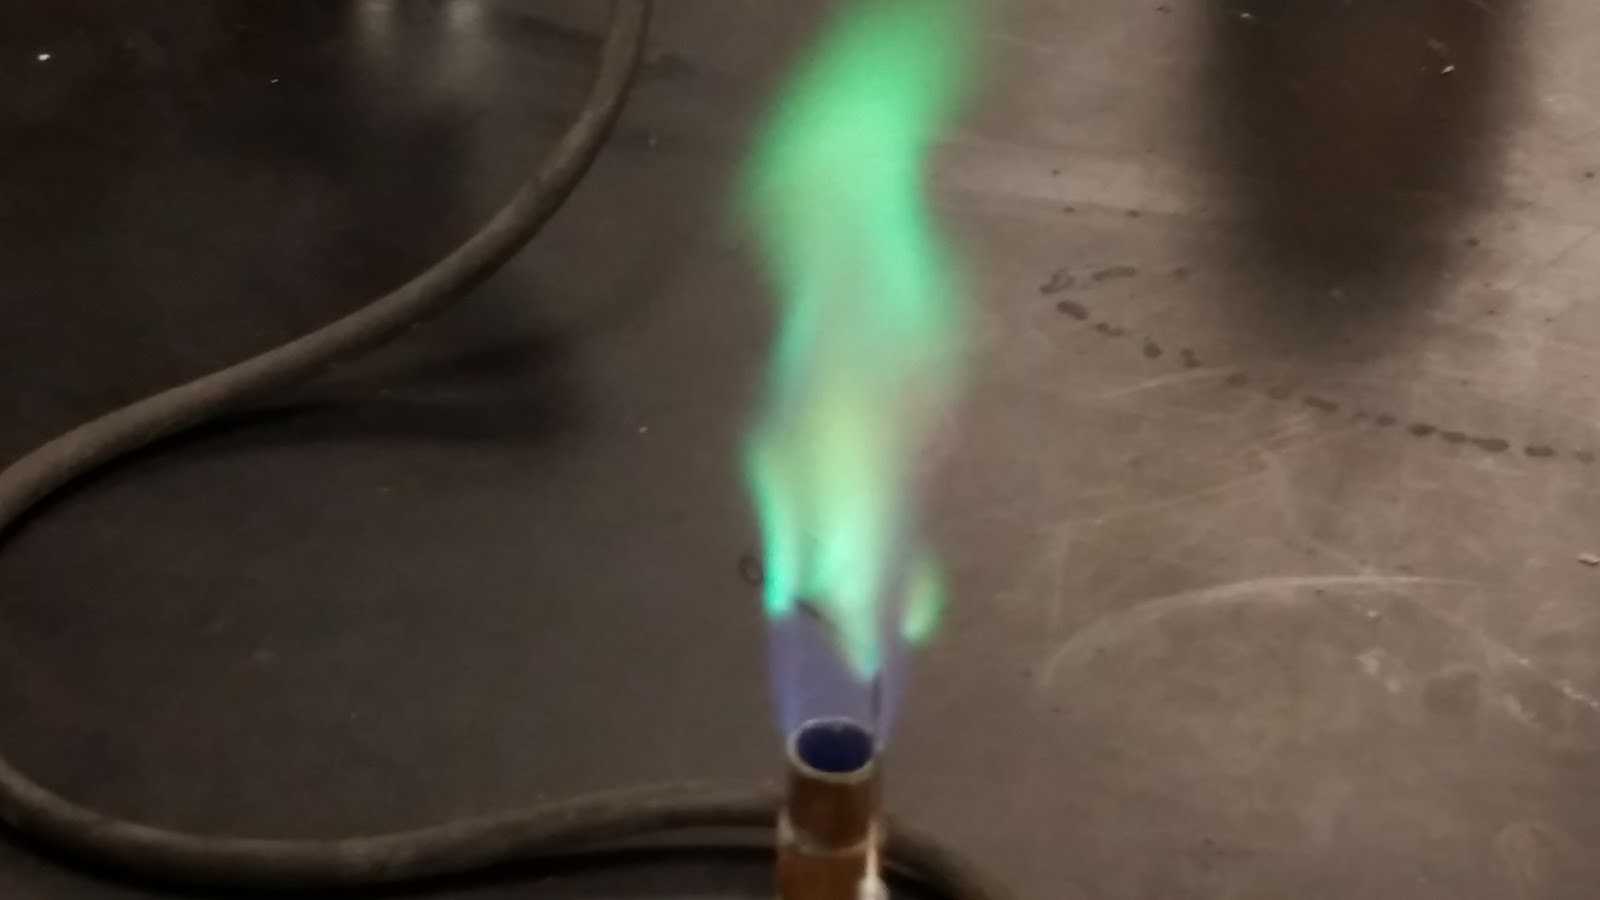
Figure 8: Flame testing CuCl2 and LiCl solutions
The discussion here is kept to a minimum. The key ideas are reinforced that the elements are producing different colors and each element is producing multiple colors of light.
Lesson #3 - Light demonstrations
In lesson #3 we begin with the intention of eventually explaining why a single element will produce multiple colors of light and why the colors vary from element to element. But first we have to improve our working model of what light is and how light interacts with matter. A series of demonstrations and guiding questions are used.
What is light?
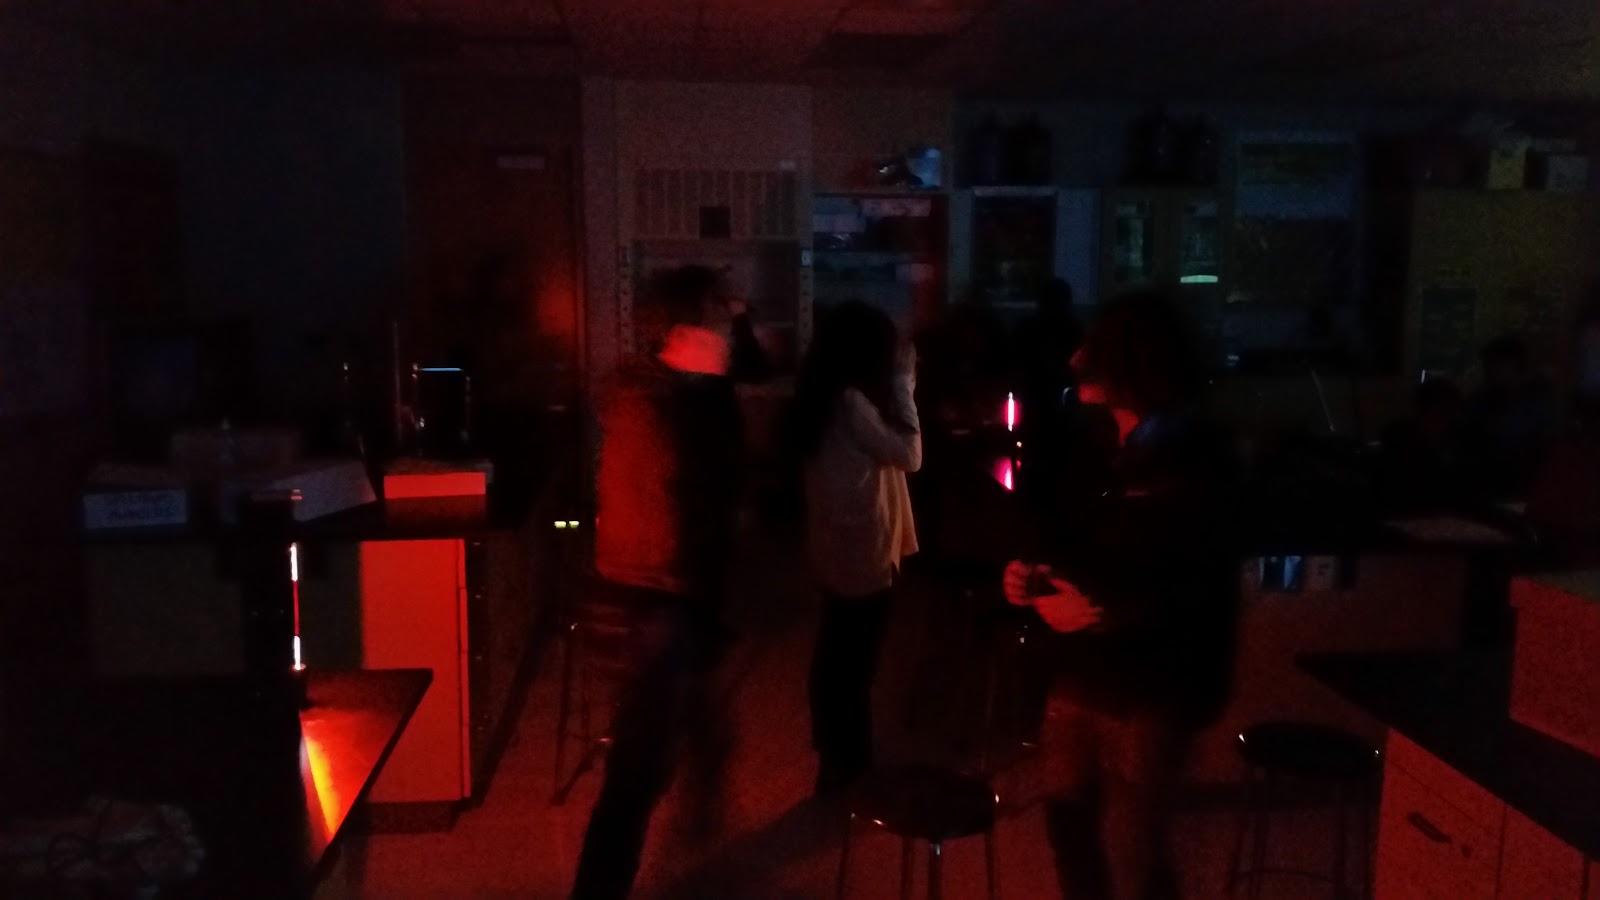
It is easy to find a short-answer or definition to this question that avoids the deep thinking needed to really grasp what light is. I begin with a demonstration of a ruler being attracted to a charged pool noodle seen below.
The purpose of this demonstration is not to understand how polarization works, rather it is to introduce the idea of a field. How is that the ruler and the pool noodle can interact without touching? Michael Faraday developed the idea of fields and here we establish that charged particles can interact without touching, at a distance. We use the field idea to describe how these interactions would take place at any given point.
We then immediately move onto a PHET simulation called electric field hockey. The simulation is a game where you try to propel a charged particle into a goal while avoiding obstacles. The simulation allows you to show fields from the charged particles and also how they change as you shake a particle. This disturbance to the electric fields is what light is. This is a very challenging idea so we want to spend some time showing how two charged particles would interact via the field disturbances. If we shake one particle, the electric field is disturbed which would then create a variation in force on other particles. This process is what we call light. The veracity with which you shake the charged particle will impact how much the change in motion the other particles have. Here we set the foundation for frequency and how frequency influences the ability of light to cause greater or lesser impacts.
Now is a good chance to show students an image of light that they would have seen in the past in a textbook. A picture such as Figure 9.
Figure 9: A representation of disturbances in electric and magnetic fields1
Next I like to follow up with a demonstration on the optical activity of corn syrup. This allows me to show the students some evidence of the electric field composition of light. The corn syrup has 4 different groups bonded to carbon atoms that causes a change in the electric fields of light and it affects different colors differently.
This is also a good chance to show the students the difference between a wave pulse and a standing wave as they likely have only seen waves presented as a standing wave up until this point. I get one of the longer slinkies out and have a student hold the other end. I start by setting up a standing wave and then show the students a wave pulse where I just give a brief shake of the slinky and the wave travels down the slinky and back. I try and show how a series of wave pulses causes the standing wave as well. If you get out the slinky it is worth it to go through frequency as the number of shakes per second and how this would translate to light waves (the number of shakes of the charged particle per second) as well as how this impacts the wavelength.
What types of light are there?
There are 7 different types of light (radio, microwave, infrared (IR), visible, ultraviolet (UV), X-rays and gamma rays). I use the PHET simulation of radio waves to show how radio works in their car. For microwaves it can be fun to put ivory soap into a microwave or a candy bar. For IR light some cell phone cameras can detect it (my Samsung 6 works well, iphones do not, older phones usually work) so put a remote control in front of the camera and it will display the infrared light as visible on the camera screen.
For visible light I really like the photoelectric effect demonstration from Flinn Scientific. Then at the end transitioning into UV by using the glow in the dark strip along with a transparent surface with sunscreen sprayed onto it.
For purposes of memorization I like to briefly pause after visible and set the line between the safer forms of light and the more dangerous forms of light. If you’re scared of radio waves from a cell phone, microwaves or from power lines you should be more fearful of light coming out of a light bulb. In reality there is little risk from these types of light because they do not have the capability of producing changes in electron motion that can disrupt bonding interactions in DNA. The final three types of light on the other hand are much more dangerous.
For ultraviolet light a black light is needed to show various fluorescence demonstrations. I also enjoy showing students various forms of currency under a blacklight and if you plan it in advance, many students have access to some at home.
You probably will not want to do a demonstration of x-rays or gamma rays in class. But there are lots of interesting talking points about both. X-rays are dangerous, hence the lead protection for your organs. X-ray technicians in hospitals wear badges that measure how much exposure they have had. Pilots and flight attendants have their time in flight monitored to limit their exposure to higher levels of radiation while in flight. Gamma rays are produced in stars, but also mostly absorbed before reaching the surface of the star.
Finally a summary of the seven types of light is constructed. Highlight that infrared is next to red in the visible spectrum and ultraviolet is next to violet. I like to draw a line between visible and ultraviolet separating the dangerous light from the safer light.
How are different types of light different/similar to one another?
This question ties the first two questions together. The composition and origin of light is the same for all 7 types. But we distinguish them so there must be some differences to contrast. All 7 types of light originate from an accelerating charged particle. Thus we loop back to the slinky and the frequency with which we “shake” or “accelerate” the charged particle. The greater the initial “shake” the larger the “shake induced in the other charged particle that absorbs the light. To put the shaking into perspective we should now look at light mathematically. Here we now go through the equations for speed, wavelength, frequency and energy. I stress that the speed of light is constant in ways that do not make sense (special relativity) in our everyday experiences. When people say that light slows, what they’re really saying is that in some medium light spends some time absorbed and thus is not moving the whole time and thus appears slower. I then present the equations for light calculations and discuss the units of frequency and try and compare wavelength, frequency and speed with turnover, stride length and speed in track.
In the end the differences in light really stem from how suddenly the charged particle changes its motion or how much the charged particle accelerates.
How does light interact with matter?
We now have a much improved model of light and can now interpret the crazy results of light emission spectra. We only see certain colors of light from an element. This means that the changes in motion of electrons in an element are restricted. A change in motion can occur, but the starting and ending points of those motions are limited. Electrons in atoms have defined, discrete or quantized motions. We can represent these motions with circular orbits in the Bohr model of the atom. When an electron is an orbit it can absorb light to change its motion. But it can only change in discrete values, which is really weird and unexpected based on our prior physics knowledge. But if the electron could move in any way, we would see all colors coming off of the spectral tube, not discrete light frequencies.
Why do different elements give off different colors of light? The motion of electrons differs in different elements because they have different numbers of protons and electrons. The forces from these particles influences the motions capable for the electrons and thus what types of light are produced.
A good way to demonstrate this is to take some colorful balls (make sure all glassware is put away first!) to students and have them toss you a red photon or an orange photon. I don’t absorb the red or orange photons, but a yellow photon causes me to jump to a higher state of motion represented by standing on a chair. When I return to my original state of motion (represented by the ground) I emit the yellow photon. A blue photon causes me to rise up to the desk and I emit a blue photon when returning back to the ground state. A violet photon causes me to rise up to a textbook on top of a desk (energy levels converge as they increase).
What challenges are there to learning about light
Circular motion is already challenging for students to understand using classical physics. Adding in the quantum restrictions makes this worse and not having any end game for visualizing motion makes it even worse. Many students have misconceptions about circular motion such as thinking there is no gravity in space (or that the motion of orbit negates gravity), they have misconceptions about a centrifugal force balancing a centripetal force or they just do not understand the combination of forces and motion that result in circular motion. To compound on these shaky initial settings, we are describing circular motion as not producing light (when the charged particle is accelerating) and only when the circular motion is altered do we see light.
Our model for representing motion states are lines that indicate position. When we draw orbital diagrams we represent a motion of an electron with a single line.
Students may not know what a field is. The idea of representing what could happen with a field is very abstract. Many have seen magnetic fields represented using iron filings, but the concept is a challenging one.
The standing wave of light makes it look like there is an up and down motion of something. Really the strength of the electric field is changing, so the arrow moving up is indicative of how strong the electric field is at that point.
Students are very early in their development of what charge is. From unit 6 they should understand charge as being connected to electrons and protons and that it causes attraction/repulsion, but what is it?
There is a lot of lingering confusion over vocabulary words that were introduced before the concept was understood. Electromagnetic radiation and energy are two that cause hang ups that probably should be dropped out of initial teachings of light prior to high school and electromagnetic radiation might not ever be useful in learning about light.
Student reflections on light (see next section for quotes)
What models did students bring and leave with?
Initial models for students were very incomplete. I struggled with this because I had a hard time determining what it was I wanted students to know initially. I am not sure what models or concepts I need students to have in order to make this lesson run better. Maybe the relationship between speed, wavelength and frequency could prove helpful. Many students mentioned not knowing how light would originate from a light source as something they were initially very surprised by not having ever thought of. Some talked about only thinking in terms of reflection, but never origination of light. I also am looking at this through the lens of chemistry, but a biology or physics teacher might have different hopes for what students begin with.
Final models varied and most students picked some concepts up but not all (or not all were expressed in the reflections). The concepts students picked up on also varied and many conceptions still need developing. One of the most common issues is that students view orbital diagrams as a stand still position (S1, S4, S9). It’s easier for them to see the Bohr model rings as an electron moving in a circle, but when we represent arrows on lines for quantum mechanics they tend to hear a lot about moving up, or moving down and they do not translate that into the 3D scale of an atom and how the electron is moving. A good example that does attempt this is S21.
Many students did well in adjusting the Bohr model to the quantum mechanical model in the sense that they understand that orbiting electrons is insufficient but that actual motion is much more complex and that we cannot observe the motion directly. Students in the midst of clarifying this can be seen for S10, S11, S13, S17 and S23.
Many students have connected light with charged particles or electrons and have an emerging understanding of the connection between the two. There is some lingering confusion on what charge is that comes out (S5) and some express confusion over the overall complexity (S8, S19).
The physics does not present itself to be a problem thus far, but you can find bits of physics ideas about circular motion that could be problematic down the road and require addressing in a physics setting (S22).
S12 and S16 show how the term energy was used to avoid learning and being curious about what light is. If light is energy there is no need to experiment or think through the origin of light. While the electric field disturbance is more conceptually challenging, it can be supported with evidence, represented using a model and retains the curiosity of what is going on with light that can be interfered with when using energy. S10 perhaps shows a similar sentiment for the term spin that it is not understood. The solution for spin though is probably beyond this class level.
Many students had very negative descriptions of their initial models of light and would make comments that they knew nothing and now know everything (S8, S18, S21 and others not transcribed). The metacognition in the reflections was often quite poor and described learning in a simplistic manner. I did not know it, but now I do. There was often a lack of progression through connecting ideas and concepts together to build more developed understanding of light. Students instead frequently expressed that their initial ideas were wrong, and the new ones are correct to describe their learning.
Student quotes from their reflections at the end of the unit
S1 Understanding that light is the changing positions of electrons helped me understand more on what and how light works.
S2 Electron movement gives off light
S3 The element changes when the number of protons changes
S4 I know that light is produced when the electrons in an atom are hit with energy and moves the electron to a different orbital on the atom that is higher than the one it was on. After this the electron falls back down to its original position and when this happens energy is produced in the form of visible light.
S5 The visible light we see is caused by the electron receiving enough charge to move orbitals.
S6 It (light) is produced by the movement of the electron around the nucleus.
S7 This unit, I was able to really understand the relationship between protons, neutrons and electrons. I always learned that they were connected but I never really knew how.
S8 I never really realized that light had so much to it. I knew the basics of light, like the stuff they teach you in middle school, the boring and stupid stuff. Even though what we are learning right now is so complicated and has a lot to it.
S9 I now know that light is emitted when an electron jumps to a higher level and then falls back down to a lower level.
S10 Now I am under the impression that it’s more cloud-like as they move so fast and don’t follow a simple pattern like I thought. The idea of orbitals was also very new to me.
Also I learned about electrons having up and down spins, which I still don’t really know what it means.
S11 When an electron changes motion due to additional energy, it changes energy levels, moving up orbitals (s,p,d…). The higher the energy level, the light produced will approach violet on the visible light spectrum. The lower the energy level the light produced will be on the red side of the visible light spectrum.
S12 All that I thought I knew about light was that it came to Earth mainly from the sun in rays and that it was a form of energy.
S13 Now I’ve learned that light is made up of charged particles that change how they move and accelerate. The particles move direction and distance and can be in one type of motion or another, but scientists have discovered that they have no intermediary motion or “in between”.
S14 I also had a basic understanding of what light was but I did not know what was light doing, like how does it come to be.
S15 I didn’t understand why we use that [Bohr] model. Now I understand why that model exists and how it was developed.
S16 Before unit 10 I thought light was simply rxn energy emitted by the sun. But as we got to learn more and more light comes from charged particles that accelerate. Light is made out of electrical fields.
S17 I knew that electrons spun around the nucleus in levels with more electrons per level the further away the level was from the nucleus. However, I did not know that the electrons spun in specific orbitals. I thought that the electrons spun in clouds at a certain level and stayed there for each element. Now I know that per energy level, there are different ways that an electron orbits the nucleus. For example, s orbitals move in spheres while a p orbital moves in sort of hourglass form.
S18 Now I realize that I actually had no idea at all what light is and why it’s there. Now I know that there’s light when a charged particle accelerates (is moving). A clear definition of light is disturbance of the electric field.
S19 Different elements have different paths because they all have a different number of electrons. Carbon has 6 electrons while magnesium has 12 electrons. They would follow different paths because of their different electrons. This concept is still a little unclear to me but I understand it more than I did before.
S20 Charged particles change their motion and accelerate. Light are disturbances within an electric field.
S21 Before my perception of light was that it was some kind of charged particle. To be honest, I wasn’t even very clear on what light was. On the day that we did the spectra lab, there was a bit more insight on how light was produced. I only knew that color appears by an object reflecting a color, but to produce a color without any initial light stumped me. I didn’t understand how light was produced or what light really was (like if it was actually a particle or some kind of energy?).
I think on a 2d platform, the idea of light hitting the electron, stimulating it to move to a higher energy orbital and then falling back down to its original energy orbital, then making light is easy to comprehend. Bringing in the 3d orbitals are harder to comprehend and I don’t think I can visualize or completely understand the interaction from that perspective.
S22 Before this unit, I simply knew that electrons floated in rings around the nucleus, where the protons and neutrons are located.
S23 In middle school, we learned how to balance atoms with 2 electrons in the first ring and so on. Now I’m aware that each “ring” is a different energy sublevel.
S24 Light comes from charged particles (e-) and these charged particles give off light when they change how they move. Electrons move in a circle in different energy levels, these energy levels are different for every element.
Overall, I learned more about what light is (electric field that is changing and is also a disturbance in the electric field).
S25 The electrons in the orbitals can move up and down to make light/energy.
S26 I finally understand the up and down arrows represent electrons and the direction is the spin and how there are always two on a line.
S27 I at least know that light is the disturbance in an electric field.
How should we adjust our teaching of light?
Avoid vocabulary as much as possible. Teaching students terms just gives them the means to avoid learning the concepts later. The phrase electromagnetic radiation serves no purpose that I see and should be discontinued unless you have some specific rationale for using it. It obfuscates the connections between similarities and differences in light which makes it harder for students to learn later.
Is the standing wave model a good initial model for waves? On the one hand it is more visually appealing, but sometimes simple means less mental struggle and students can avoid grappling with the concepts. A wave pulse should be seen by a student as this is usually a more accurate description of what is happening with electrons, and is a more general waveform.
Emphasize what the line in an orbital diagram represents. Many students that grasp the majority of the concept think of the line as a position (S1. S4. S9) instead of a description of motion. The 1s orbital represents an electron moving mostly close to the nucleus with 0 angular momentum. The 2s orbital is a similar style of motion, but a little further from the nucleus on average. A 2p orbital describes a different style of motion with angular momentum.
Teach calculations in conjunction with electron configurations and orbital diagrams. Emphasize the process of an excited electron emitting a light wave by altering its motion, light traveling to another electron, that electron changing its motion.
As understanding grows, consider addressing why different elements give off different colors of light again. What role do protons play in this? What role do other electrons have on shaping the actual energy levels we use in orbital diagrams?
What lingering questions do I have as the teacher?
We often talk about electrons changing quantum states, but I too struggle with the picture of this. For example, if an electron moves from n=1 to n=3 and this is accompanied by an absorption of UV light. How is the energy of the UV light distributed? How much of it is kinetic energy? How much is potential energy? Are those distributions constant? Are the kinetic energy and potential energy of an electron moving about the atom static beyond the uncertainty principle? How can this be given that the radial position is not static? What visual components of electronic motion in an orbital state can or should a high school teacher be presenting? What is the evidence that justifies these?
I also do not see how the photoelectric effect is in violation with light being a wave. I get the construct of a particle model, but it appears that there is overwhelming evidence and logic on behalf of the wave model and to me the photoelectric effect shows that light waves act in a singular basis when interacting with matter. The intensity does not preclude wave behavior because it is not possible for multiple light waves to combine at the exact same point because their speeds are uniform and their origination always happens at different positions. It seems to me that we were premature in our conclusion from the experiment and now this assertion is not wrestled with and it should be. Does the particle conclusion from the experiment rely solely on particle being defined as a singular unit? If so, why can a wave not be defined as a single unit and still retain being a wave? It seems simple to have a single waveform and thus no experiments would ever show light acting in a manner unable to be explained using purely wave mechanics.


